Tuesday, October 8, 2013

Laundry Stain Removal


Last week at Bible study I accidentally marked on my pants with pen (poor, graffitied pants falling victim to my "graceful" ways!). When I did laundry using our regular soap nut method, the pen marks remained so I decided to find an Oxy-clean like recipe using only ingredients I had in the house. Thanks to a tip from my husband, and google verification, here is the recipe I tried:

2 parts water
1 part baking soda
1 part hydrogen peroxide


Mix all ingredients well and pour on the stained area, then wash normally. Easy peasy, right?!?  I let mine sit for about an hour, scrubbing the pen mark stains with an old toothbrush during commercial breaks of a Gilmore Girls episode (a serious guilty pleasure of mine!)

When I put my pants in the washing machine with another load of clothes, I noticed the marks were faded, but still noticeable. I was starting to doubt this method of stain removal, but after the wash cycle the pen marks were gone! See for yourselves....
Before washing/treating, a little hard to see, but the marks are there.
After washing/treating
Marks are gone!


Sunday, September 22, 2013

Introducing: Jade Made Creations!

So sorry for the loooong hiatus...I am pretty sure at this point I don't have any readers remaining! I have been enjoying summertime (yay) and haven't made time to blog (boo).  Today's post was inspired because I came across a station on iheartradio called Indie Vegan Cookbook Radio. Of course I had to choose it to see what that was all about. I was pleasantly surprised that the bands/people featured are ones that already listen to through my other stations (I will listen to anything, but alternative & rock are my favorites). So here I am listening to vegan radio and blogging about my crunchy transition.. It is a good day!

Even though I haven't posted anything new to my blog since June doesn't mean I have abandoned my crunchy/natural journey. One of my favorite changes this summer was significantly reducing our household's use of throw away paper towels. This was possible because Tim and I bought some Un-paper towels from one of my friends, a "work-at-home-mom" Jade Chiu! These towels are made of cloth and have snaps on the corners so they can be attached and placed on a paper towel holder. Use them as you would a regular paper towel, but instead of throwing them away, you just wash and reuse! 

Jade is super talented and makes all kinds of cool, reusable products, accessories, and items for baby! Check out her website here, or visit and like her Facebook page, Jade Made Creations! 


As always, thank you for reading and feel free to leave a comment!
Heather


Sunday, June 23, 2013

Our Growing Garden!

Happy Summer!!! I love the season that brings warm weather, July 4th, beach trips, skirts, cookouts, and REAL FOOD!  In celebration of the new season I thought y'all would like to see updated pictures of our hay bale garden. For those doubters out there, YES, we have fruit and vegetables growing, and I can not wait until harvest time!  My first post on straw/hay bale gardening (along with "before" pictures) can be found here. Let me know what you think and if you would ever try growing your own straw bale garden. I appreciate the interest that the original post has generated!
The whole garden (perfect for two)!
Soon, we will have a lot of squash!
Zucchini is about to explode into yummy goodness!
Cucumbers too! 
Our tomatoes are doing extremely well!
A pepper.
Cherry tomatoes!

Sunday, June 16, 2013

Green Cleaning!

In an effort to use safer cleaning products around the house, I have been making my own versions as I run out of the store bought/conventional products I have on hand. The homemade versions are generally much safer AND they clean & disinfect just as well, if not better than their chemical laden counterparts!

I have been tweaking my go-to recipe for an all purpose cleaner over the past couple of months and have come up with a mixture that I love using for all of my cleaning needs.. really!

Drumroll please.......

The recipe:
3  cups of hot water
2 Tbsp Borax* (disinfectant and bug repellant that is safe for pipes and septic systems)
4 Tbsp vinegar (the acidity in vinegar helps kill germs and reduce microbial growth, a safe cleaning product!)
10-15 drops of lemon or Tea Tree  essential oil (I used lemon for the fresh scent and it's antibacterial and anti fungal properties. Tea Tree, or Melaleuca, is a powerful antibacterial and anti fungal, making it a great addition to your cleaning supplies as well)

Mix all of the ingredients together in a spray bottle and store out of direct sunlight.
*Important* make sure you label your containers/spray bottles!!!

Give the bottle a little shake before each use and you have an environmentally friendly, inexpensive, and safer cleaning solution that's works!

*Although Borax is an all natural product(sodium tetraborate, a naturally occurring mineral), use caution when handling. It is an eye irritant and can be harmful if ingested.


Thursday, June 6, 2013

Traditional Medicine to the Rescue!

A little background for ya:
About a year ago, a friend recommended a center specializing in acupuncture, Chinese medicine, and healing arts for my healthcare needs. At that time I had just had my third miscarriage and was willing to try just about anything to have a child. I looked into it and shared the information with Tim. We were both interested, but something was holding me back. Maybe it was fear of going in a different direction with my health, maybe it was that I had been to so many appointments around that time that I was just doctored-out (doctor can be used as a verb, right?!?), or maybe the truth was that I was not emotionally ready for this step. Even though I did not initially go, the idea of a different approach to health care stayed in the back of my mind. Holistic Healing/Chinese Medicine is definitely natural so I researched, learned, and ultimately decided to give it a try!


The Lotus Center
A year later, I scheduled an appointment at the Lotus Center for fertility and acne. When I arrived I was greeted by Joy and Matt and was then taken to a back room where I met Michele. These three made me feel like everyone should feel at an appointment, a person, not just a number to be rushed out of the door. This was unlike any medical visit I have ever had. I was first guided through intuitive questions and shared my medical history. Then Michele suggested acupuncture and herbal medicine as my treatment. I was also instructed to eat foods that would build my blood and track my BBT for signs of ovulation. Needles do not bother me in the least, so acupuncture was incredibly relaxing and enjoyable. For around thirty minutes, there were small needles hanging out in my legs, arm, feet, stomach, and forehead while I listened to soothing instrumental music in a dimly lit room. it was perfection! it was too brief, but there will be  many more sessions to come. In order to treat the underlying cause of my specific issues, I will be going back once a week through July for adjustments in my herbal blends and acupuncture. Before leaving the center (1 1/2 hours later!), Joy and Matt filled my prescription (herbs) and taught me how to cook them.  At this point I don't care to ever go to a "regular doctor's office" again. The level of care given here was amazing!

I am hopeful that this will lead to a healthy pregnancy and ultimately a child for our family!

Cooking my herbs:
Once home, I used my recipe to make a decoction.
Step 1: Soak the herbs in 4 cups of water for 20-30 min

Step 2: cook on med heat for 25-30 min, strain. 
Step 3:Cover herbs in water an cook for 5-10 additional minutes. Strain and add all liquid together.

Step 4: store herbal tea in the refrigerator in air tight jars until ready to use.
(I am drinking 2 cups/day) 


What are your thoughts on Traditional Medicine? Have you tried it, would you try it? Thanks for your input (and for reading) !!!


Sunday, June 2, 2013

Eco Friendly Laundry

I haven't written a real post in a while. It isn't because I have forgotten about the blog and you, my fabulous readers, but because I haven't been home long enough to get my thoughts together. In the past few weeks I have continued trading out our go-to conventional products for natural ones. Tim and I are embracing the lifestyle changes and now he is even coming up with ideas for us to try!!!

There is a great resource for those of you looking to see how environmentally friendly your cleaning, cosmetic, and other common household products are at www.ewg.org.

 Excerpt from their website (About us): "The Environmental Working Group is the nation’s leading environmental health research and advocacy organization.  Our mission is to serve as a watchdog to see that Americans get straight facts, unfiltered and unspun, so they can make healthier choices and enjoy a cleaner environment. We use the power of information to create cutting-edge research and advocacy that transform government policies and the marketplace in order to conserve land and water, produce and use energy responsibly and ensure that food and consumer products are free of harmful chemicals. We investigate government subsidies that encourage wasteful practices, and we support policies that promote thoughtful stewardship of our land and natural resources. With your help -- and with the help of hundreds of organizations with whom we partner -- we are creating a healthier and cleaner environment for the next generation and beyond."

I was curious about our regular laundry detergent, Gain Ultra HE Liquid Laundry Detergent, Original Fresh,  so I looked it up. Wow, I was completely shocked at the results! Based on their data, our detergent scored a F, really a F!! The ingredient with the highest health concern was Sodium Borate which can have negative endocrine, reproductive, and developmental effects. A complete breakdown of our detergent can be found here.

The information I just discovered sent up huge red flags for me because Tim and I are trying to have children. That being said,  I set out on a mission to find a better alternative detergent for washing clothes. It didn't take long before I came across soap nuts (or soap berries) as an eco friendly-hypoallergenic- organic- natural-all around awesome-soaping fruit! (See my previous post explains what soap nuts are by clicking here.)

I ordered our soap nuts from Eco Nuts (around $40 for 360 loads!) and started using them immediately after the arrived. I LOVE THEM! They are easy to use and effective at cleaning. All you have to do is put 5-7 soap nuts in the provided cotton pouch and toss them in the washer. After 4-5 washes, replace the soap nuts and you're good to go for the next several washes. (you will know to replace when they become white and very soft, see picture below)

I feel relieved that I will never have to buy commercial laundry detergent again!
Soap nuts on the left are used and need to be replaced, 
while the ones clustered on the right are fresh and ready to use


Thursday, May 23, 2013

Here it Grows!

This will be a short post, but I promised that I would keep you all updated on the progress of our little garden. guess what?? It is growing pretty well! It really had no choice considering all of the rain we have been getting! The tomato plants are flowering and it looks like everything else is beginning to also. Woohoo! New to straw bale gardening? Visit my original post on planting the straw bale garden here,  As always, feel free to share your thoughts, questions, best practices, and suggestions!

The zucchini, squash, cucumbers, and tomato plants have taken off! 
I am sure the watermelon and pepper plants aren't too far behind. 


Wednesday, May 15, 2013

Olive's 1st Crunchy Experience

Olive is our two year old child  dog. We most definitely do not view her as a pet, but a member of our little family. Because of this, it only makes sense that we stop bathing her in commercial pet shampoo and use a natural alternative!

I have been using soap nuts to do our laundry (post coming soon) so I figured that these amazing little nuggets of nature could be used for more! Guess what? I was right! I found sooooo many household uses, including pet (and people) friendly shampoo!
Example of a Soap Nut
First of all, What is a soap nut? These are not nuts at all, but actually a dried berry. They are the fruits of the soap nut tree and the dried shells contain Saponin,which is a 100% natural alternative to chemical laundry detergent, soaps, and cleaners. When mixed with water, they create mild suds, which is similar to soap.

The recipe:
15 soap nuts 
6 cups of water

Bring the water and soap nuts to a boil. Reduce the heat and simmer for about an hour, or until the shells turn white and soggy.

After cooling, I poured a cup of the soap nut liquid into a small spray bottle (labeled). I poured the remaining liquid in a mason jar and stored in the refrigerator to use later.


Bath Time!
I filled the bathtub with warm water and bathed olive as usual, substituting the soap nuts liquid for her normal pet shampoo (making sure to keep it out of her eyes to prevent the stinging that would occur). In the end, she was clean and her smelliness was neutralized. Great success!

Side note: We have been brainwashed into thinking that there has to be a rich, sudsy lather to get clean, so do not be disappointed when this mixture is lacking in the suds department. I assure you, it is doing its job!
 
                                      
She got a haircut on Monday, so she isn't quite so fluffy. I should also note that her beard and front paws aren't dirty, they are stained from digging around in the back yard.


Monday, May 13, 2013

Meatless Monday!

When cooking for others I try to accommodate all food preferences the best I can. I am vegetarian, Tim is a carnivore, and our friends are everything in-between. Tonight I needed a gluten free recipe so I decided  to try pasta-less vegetarian lasagna! Let me preface this by saying that I don't like "other people's lasagna" not that I am a food snob or anything, I just don't like ricotta cheese! So I developed my own recipe a few years ago, and adapted it for dinner tonight.

Ingredients:
Zucchini (4-5 small)
Squash (1 small)
Chopped carrots (about 1 1/2 cups)
Chopped onion (1 med.)
Broccoli (about a cup)
1 1/2 jars of your favorite tomato sauce, or homemade
Mozzarella (3 cups)
Dried or freshspices/seasoning (garlic, oregano, parsley, basil, pepper)

Directions:
-The zucchini will take the place of the pasta. Cut each lengthwise and boil until tender.
Drain and set aside.
-boil the carrots and onion in water for about 7 minutes, add the other vegetables and continue cooking for 3 minutes. Drain water and retur the vegetables to pot.
-add your sauce and spices/seasoning. Mix and cook until heated throughout.
- layer zucchini"pasta", sauce and mozzarella twice in a large baking dish. Bake on 350* for 25-30 min.
Serve and enjoy!


Wednesday, May 8, 2013

Tackling BO, the Natural Way!

Tim gave me the idea to make a natural deodorant. A month or two ago he changed from a commercial antiperspirant to just deodorant. Surprisingly, he found that he was sweating much less than before (and cutting down his exposure to some nasty chemicals)!

The main, active ingredient in antiperspirants is aluminum. It works by clogging the pores under your  arms to prevent sweating. Studies have argued that exposure to aluminum via antiperspirants has been linked to cancer (especially in women), Alzheimer's disease, and other health concerns. Although these claims haven't been 100% proven, is that something you would want to take a chance with? For me, the answer is a huge NO! Our bodies were designed to sweat as a way to cool us down. also, if there is an effective natural solution, I would much rather go that route ( I am going crunchy, aren't I?)!

Making homemade, natural deodorant was second to trying the No 'poo method (see that post here). All of the ingredients were already in my kitchen, and it literally took about 5 minutes to make...win!

 I used a basic recipe to start with:

-6 tbsp coconut oil (antibacterial properties/nice fragrance)
-1/4 cup baking soda (soaks up moisture/ deodorizes)
-1/4 cup arrowroot powder/ or cornstarch (soaks up moisture)
-Clean, dry jar with lid, or recycled deodorant container.

Mix the baking soda and arrowroot/ cornstarch together, add coconut oil. After mixing for a few minutes,  the ingredients will come together to form regular deodorant-like consistency. At this point you may add in a few drops of essential oil (I did not do this because I didn't have any on hand, but I will add Tea Tree Oil in the next batch!)
Ingredients 

Keep stirring until all ingredients are well blended.

Transfer your deodorant to a dispenser or jar.


As you can see, I used an empty, clean deodorant dispenser. If you do this, be careful in warm temperatures. Coconut oil melts around 77-80*F. If this happens, place in the refrigerator and it will solidify again. If you use a jar, apply a small amount with your fingers.

The BIG question.... Does it actually work?
I was skeptical at first, but I quickly discovered that it totally works as a deodorant! I ditched my commercial antiperspirant/deodorant and I still don't stink! I prefer it to anything I have used in the past.

This recipe is not an antiperspirant, but as you read above, sweat is a good thing. I have been using my homemade deodorant for about three weeks now and I have found that I am sweating less than I was on the commercial stuff. The antibacterial properties of the coconut oil mixed with baking soda/ arrowroot(or cornstarch) keeps me fresh all day (even at the gym)!

I will be experimenting with other recipes in the near future because there have been reports of people's sensitive underarm are having a reaction to the baking soda. This did happen to me the first two days, but I adjusted my recipe to add more cornstarch and the rash went away, leaving me with smooth, tropical smelling underarms.

Have you tried this recipe, or a different one? Let me know how it worked for you by commenting on this post.

Disclaimer: I have spent the past few weeks researching the subject of antiperspirants and only briefly shared the facts that I gathered. That being said, I am not a scientist or doctor, so I encourage you to do your own research in order to come to an educated decision about what products you and your family are comfortable using.

Saturday, May 4, 2013

Learning Curve

In my very first post, I wrote that there would be many trials and errors during my transition to all things crunchy....yep, the first big (ish) error happened and it involved my hair. Well, not really big, just time consuming and slightly annoying. I will stick with big(ish)!

I gave up shampoo and switched to no 'poo 17 days ago ( yes, I've been counting). I thought it would be difficult to lose the squeaky clean feel and lather of conventional shampoo, but surprisingly it wasn't. Until last night.

Let me explain.... I have been trying to transition my hair/ scalp quickly to the no 'poo method by waiting at least five days between washes. I was fully prepared to go out in public with my hair a hot, greasy mess. To my surprise, it looked great for the fist three days, by the fourth day my hair was starting to look a little gross, but by using a natural, boar bristle brush, I was able to blend the oils into the dry ends of my hair. Win. Yesterday was the fifth day and at this point my hair was looking pretty bad. Again, I didn't mind because I expected this to: a. happen much sooner in the week b. it was mainly my roots/bangs c. I was planting my garden and had no plans to leave the house last night. I knew I was going to wash my hair (baking soda/ACV) later that night anyway, so I decided to try something new. I would attempt to deep condition my hair using coconut oil. I rubbed a palmful around in my hands until it melted and  applied it to my hair(avoiding the roots). By the time I finished it looked like I had just gotten out of the shower....but I was still optimistically excited that my new favorite, use it for everything, amazing gift from above, coconut oil would be the cure for my over-damaged hair. I left it in for a few  hours (that should be long enough to soak in and work its magic, right?) and got in the shower thinking, " I really just want to use some shampoo and feel clean!" I resisted the urge and washed using the recipe from my No 'Poo post. It was glorious! I haven't washed my hair for days and now it felt clean! After the final rinse, I got out of the shower and left my hair to air dry. The problem came when it didn't dry. The  coconut oil didn't come out! At this point, my conventional shampoo was calling but I continued to resist because I had come too far to just go back to the cycle of washing my hair everyday. So I came up with a solution....

1. Covered my hair in corn starch and turned on the hair dryer to heat the oil to melting point. The goal was to have the corn starch soak up the oil.
2. Get back in the shower and wash with double the amount of baking soda( 2tbsp./1cup water) and scrub, let sit for a few minutes, and rinse under hot water
3. Spray a mixture of 3tbsp. ACV/1cup/water and let sit for a few minutes, rinse under hot water.
4. Use a towel to dry some water off of your hair.
4. Blow dry

This process  took almost all of the coconut oil out, and I did it without harsh chemicals and stripping my hair! It will be a very, very, very, very, very, long time before I "deep condition" my hair with excessive amounts of coconut oil (or any oil for that matter) again!

Friday, May 3, 2013

Our no dig, no weeds, garden!

I grew up on garden food (thanks mom!) and have always been a veggie lover. Seriously, as a small child, I preferred salads over any other meal option! One of my dad's favorite stories to tell people happened when I was about four years old. My daddy and I were in a truck stop  (He is a truck driver and sometimes I got to go with him). When the time came to order, my daddy asked me what I wanted. I responded, in my little southern drawl, "A salwad, just a salwad." . What can I say? I love vegetables!

When Tim and I got married I thought the days of fresh garden food were over. We spent our first summer in an apartment. By the second summer we were in our current house, but instead of soil, we have red clay. On top of it all, we had no clue where to begin! Late last summer I started looking into other options and came across container gardening. I decided against this option because I am not a huge fan of clutter and felt like containers and pots everywhere would drive me crazy. Tim liked the idea of building raised beds but before we could do that, a friend suggested something else...

She suggested that we plant a garden using straw bales. The more they explained, the more excited I got!  No digging, no weeding, and lots of fruits and veggies :) 

We ended up using hay bales because I found some for half of what straw bales were being sold for at local garden stores. Either one will work, just know that hay bales have grass/weed seeds in them that may sprout when you are preparing the bales for planting. This happened to ours,  but they pull out incredibly easy. 

There are many variations to growing a straw bale garden, but I am going to share what I did.

1. Once you have the bales, place them exactly where you want your garden to be (once wet, they will be almost impossible to move around) make sure the bales are in a place that gets 6+hours of sun each day. There are two ways to lay the bales: straw parallel to the ground or straw perpendicular to the ground. I placed our with the straw parallel because, the string around the bales is synthetic(won't decompose/break), they will hold water much better, and when the time comes, it will make it easier to plant. 

2. The next step is to help the inside of the bales decompose and compost so they will be the perfect environment for growing plants.  If you plan ahead, you just have to soak the bales with water for four weeks before planting. I did not get an early start so here is what worked for me:
  Days 1-3, water the bales until soaking 
  Days 4-6, added 1/2 cup of blood meal to each bale and soaked with water.
  Days 7-9, added 1/4 cup blood meal to each bale and soaked with water.
  Day 10, just soak with water.
  Day 11 place your hand inside the bale and if it is cooler than your body temperature, it is safe to  plant.

3. Planting! 
Use a garden trowel to separate the hay/straw, put a small amount of potting soil in the hole(do not use dirt from your yard, it may contaminate your bales with diseases or weeds) soak with water, then put a plant in, letting the hay/straw close in around it. Once finished planting, water everything thoroughly and you're finished!
(It you are using seeds, you can sow them straight into the bales or germinate and plant the sprouted plants.)


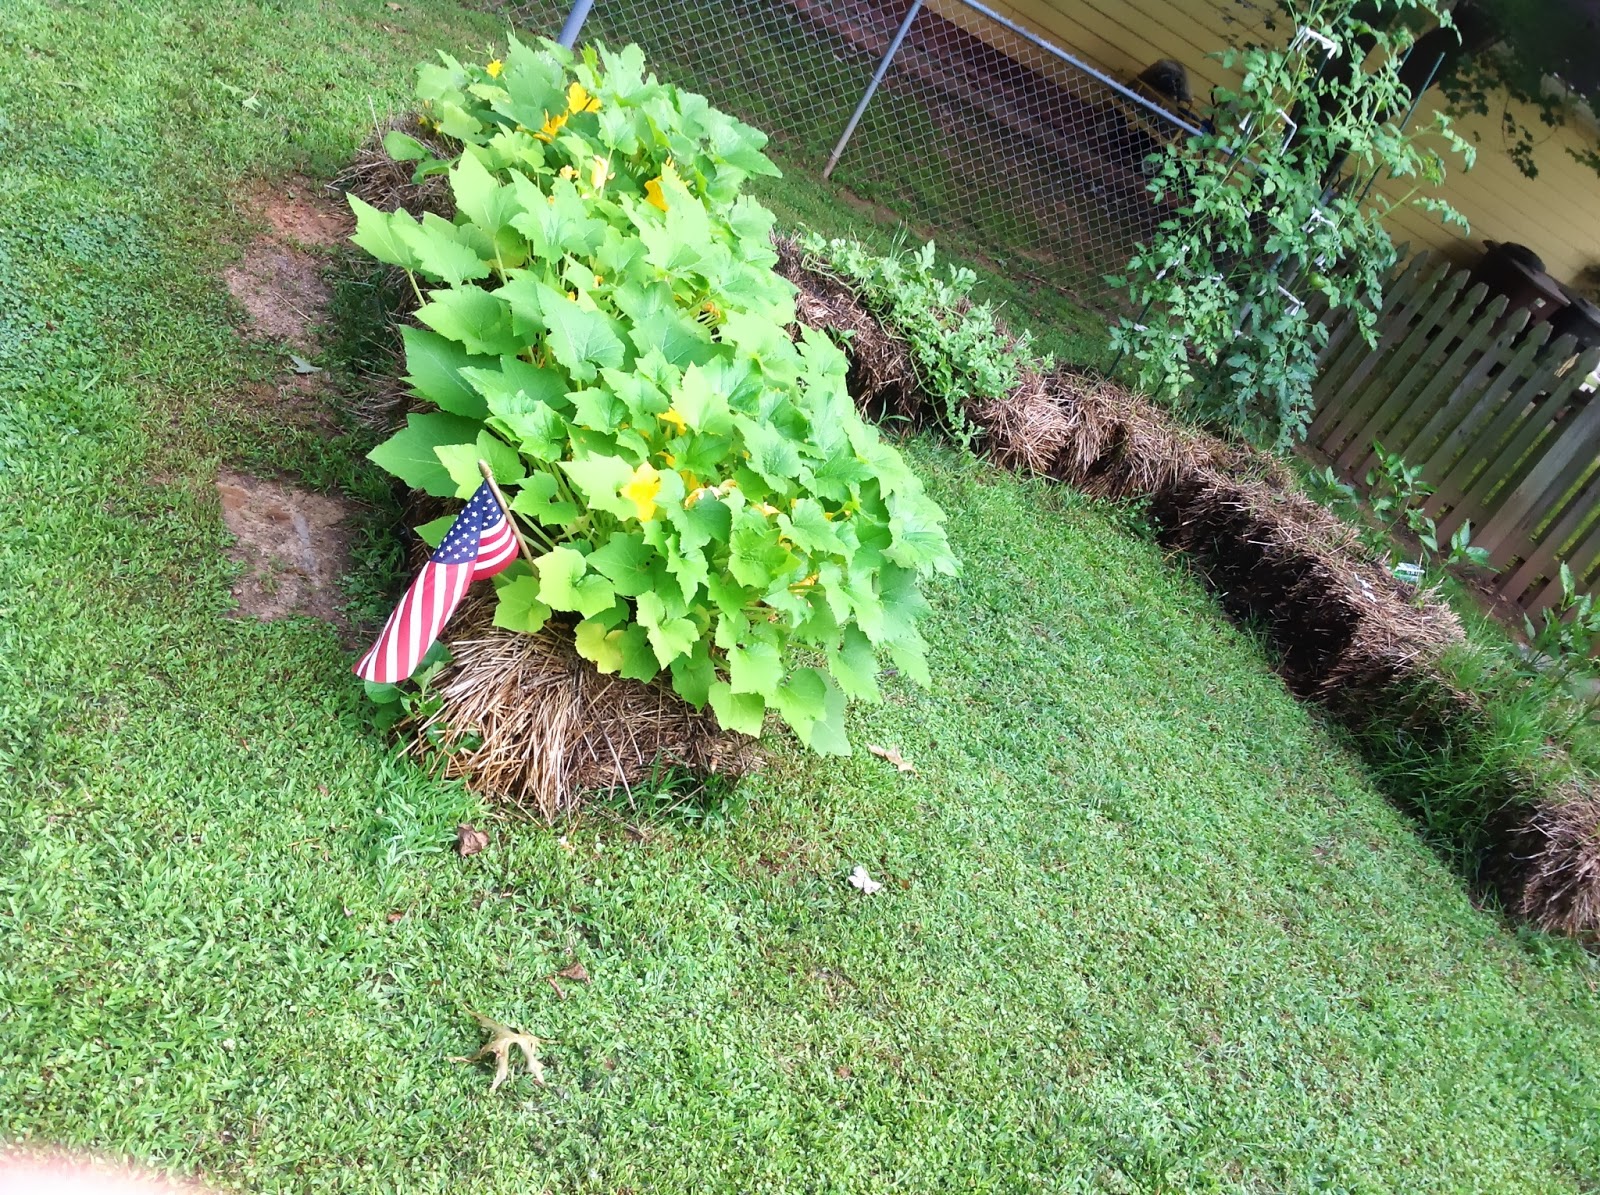
Starting off small, perfect for two!

I discovered that the inside of the bales were already starting to compost and look like soil!

Olive photo bombing  :)
In 60-ish days we should have squash, zucchini, cucumbers, tomatoes, watermelon, and peppers! I will post an update as the garden grows. 

Are you straw bale gardener? Have any tips/suggestions? I would love to hear from you!

Wednesday, May 1, 2013

Delightful Deliveries

I just have to boast of my husband's greatness today (and everyday)! I mean, really, he is amazingly sweet, patient, kind, understanding... (Are you gagging yet?) Anyway, I come home from work to find a package at the door. I got excited thinking it was the Soap Nuts that I ordered last week, but when I checked the mailbox, the Soap Nuts were in there(I will post about those very soon). So now I am thinking that Tim has just ordered some math related book or study manual and leave it on the table for him to open when he gets home. In the meantime, I send him a text telling him that something came for him in which he replies, "Yay, it finally came. It is safe for you to open, if you want :)" Well, of course I opened it because I have a serious issue with being impatient (I don't like surprises all that much either, but mainly because I'm a bit of a control freak). Inside the package is an earth friendly, all natural soy candle from Diamond Candles (every candle has a ring in it)!!! Not only do I get an eco friendly, deliciously clean smelling Lavender Lemon candle, I also get a  ring when the candle has burned down to reveal it. While I (im)patiently wait for that to happen, I will be enjoying the scent. Yay for being a girly girl and having such a thoughtful husband!

Saturday, April 27, 2013

Main Dish: Fajitas

I get a sense of satisfaction when cooking entire meals from scratch. Not only is it healthier than buying the pre-made or overly processed versions at the store, it also provides an opportunity for Tim and I to do something together.  Tonight we decided on fajitas (black bean for me/chicken for Tim) complete with colorful sautéed veggies, pico de gallo, and homemade whole wheat tortillas.

Fajita Ingredients:
Garlic, finely chopped
Onions, sliced
Bell peppers, sliced
Zucchini (quarterd and sliced) 
Squash(quartered and cut)
Fresh squeezed lime juice
Pepper

In a large pan,  sautée garlic and onion in a small amount of olive oil. Add the remaining ingredients and cook until soft. 
* Tim grilled sliced chicken breast seasoned with spices and added it to his veggies.


Pico De Gallo:
Mix chopped tomatoes, onion, fresh squeezed lime juice, cilantro, salt, and pepper

Whole wheat Tortillas (makes 6)
This was our first time using this recipe(found on "100 days of real food") Fun to make but neither of us liked the finished product all that much.  

Ingredients:
1 1/4 cup whole wheat flour
1/4 cup oil (I used olive)
1/2 tsp salt
1/2 cup warm water

With a dough hook, Mix flour, oil, and salt until crumbly (about 2-3 minutes) with the mixer still on, slowly add water and mix until a soft dough forms (about 5 min). 

Using your hands, roll dough into a log and divide into 6 equal parts. Roll each part into a ball, press, and lay on a cookie sheet. Cover with plastic wrap and let the dough rest for al least 15 min.

Sprinkle a little flour on the countertop or cutting board. Roll each tortilla with a rolling pin until they are 8-10 in. In diameter.(don't use too much additional flour or the tortilla will burn.) 

Cook tortillas in a pan on med/high heat 30-45 seconds per side. 

There you go...With a bit of planning, this is a healthy, easy, and delicious dinner to make! 


Thursday, April 25, 2013

No Poo: It's probably not what you think, people!

Did you know that daily shampooing didn't become the norm until the 1970's? Early last week I finally made the decision to ditch my conventional shampoo and conditioner. It is something I have been contemplating for a few months but didn't have the courage to actually do. Honestly, when I first found out that there are people that never wash their hair my first thought was "Eww!", followed closely by a curious, "How does that work?".

Conventional shampoos contain chemicals that actually strip all of the natural oils from your hair. This causes your scalp to produce more oil to compensate for the damage caused by shampooing, leading to greasy looking hair and the need to wash it more often. The solution to overcoming this vicious cycle (and to have healthier hair!) is to stop washing it. Bottom line, I decided to lose the shampoo and make my own "No Poo" (I know, the name is unfortunate) using diluted baking soda and apple cider vinegar mixes.

The most common ratios I have found are:
(Cleanser)      1 Tbsp.. Baking soda /1 cup of water
(Conditioner) 1 Tbsp. Apple Cider Vinegar/ 1 cup of water

Step 1-Dissolve the baking soda in water in a cup or spray bottle(I use a spray bottle).
In the shower: apply the baking soda mixture to your hair, focusing on the roots. Work it in to your scalp and through your hair using your fingers. It will not lather like shampoo, it doesn't have to lather to clean! Once you feel that your hair is smooth/slippery, rinse.

Step 2- Mix apple cider vinegar and water in a cup or spray bottle (I use a spray bottle).
In the shower: after you have thoroughly rinsed out the baking soda solution, spray the apple cider vinegar solution to your hair focusing on the ends. Leave this solution on your hair to condition it while you complete your shower routine,then rinse. Although you will smell vinegar when applying the mixture, your hair WILL NOT smell like vinegar once rinsed and dried! If the smell really bothers you, add a few drops of essential oil to the mixture.

That's it! Blow or air dry and syle as you normally would.

*With the No Poo method you should only wash 1-3 times a week (you can rinse with water in between washes) It also helps to use a boar bristle brush to distribute the natural oils throughout your hair. There will be a transition period while your scalp adjusts the amount of oil it produces.  Stick it out, it's a small price to pay for the many benefits of going No Poo!

In the week that I have gone without conventional shampoo my hair feels softer/thicker and looks shiner. I also use a tiny bit of coconut oil on the ends of my hair after it has dried for added conditioning.
    

Third day after a NoPoo washing (the worst part are my roots...time for a touch up)
I am thrilled with the results I have experienced with this method! 


Tuesday, April 23, 2013

Why Crunchy?


I love questions. Asking them, answering them, and the process it takes to come to an educated answer. Questions lead to learning and as an education major, I not only learn, but enjoy facilitating learning as well. 
Speaking of questions, it recently hit me that I never question the safety of the common products I purchase. If these everyday items are sold in all the places I shop, they must be safe, right? WRONG! Oh, so wrong. 

With every bit of information gleaned through internet resources, books, friends, and acquaintances,  I realized there is a whole other world out there! The natural, crunchy lifestyle of choosing environmentally friendly and healthy alternatives over processed and chemical infused products and "food".

This blog is going to document my transition to running a crunchy household! I'm positive there will be a lot of trial and error during this journey, and I invite you to learn alongside me. 

Ready, set, let's GO!
One small change each day, will make a BIG difference

-Heather